DIY Solar Panels
DIY Solar Panels – How to Build your Own


DIY solar panels are a great way to make your place energy efficient without spending much on installation. With recent developments in solar technologies, it is now possible to power the entire house with solar panels and reduce energy costs. But usually, pre-built solar panels are expensive, which is why not many can afford these. On the contrary, DIY solar panels are far more reasonably priced and cost a fraction of what the pre-built ones do. These are also quite easy to build and do not require any special skills or tools. So if you are thinking to build your own DIY solar panels, here is how it can be done.
Just take a break and look at these...
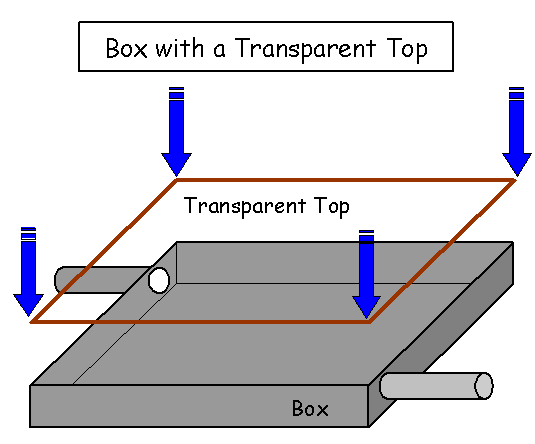
Solar panels collect heat energy from the sun. We call this heat solar thermal energy. A simple example of a solar panel is a closed box with a top made of a transparent material such as glass or plastic.
The sun shines through the glass and heats up the inside of the box. This is the same type of heating that happens to the inside of a car when it sits in the sun. In some cases the inside of the box is painted black so that it absorbs more heat. The heat that is collected inside the box can then be used for several purposes. The most common uses for solar panels is to heat air or water.
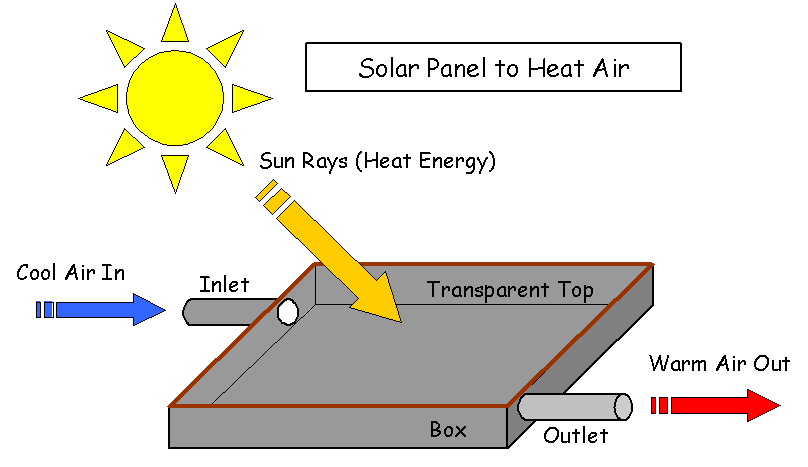
A system that uses solar thermal energy to heat air is not complex. A transparent top is attached to a box. The box has an inlet pipe for cool air. The cool air can be pushed into the box using a fan. The cool air moves through the inlet pipe into the box. Inside the box the air is warmed by the heat energy from the sun rays. As more cool air is pushed into the box the warm air is forced out the other end of the box through the outlet pipe. The warm air can now be used to heat something like your home. Some very large systems use a solar panel on the roof of a house to heat a whole room. The warm air in that room is then blown through vents to heat the whole house.
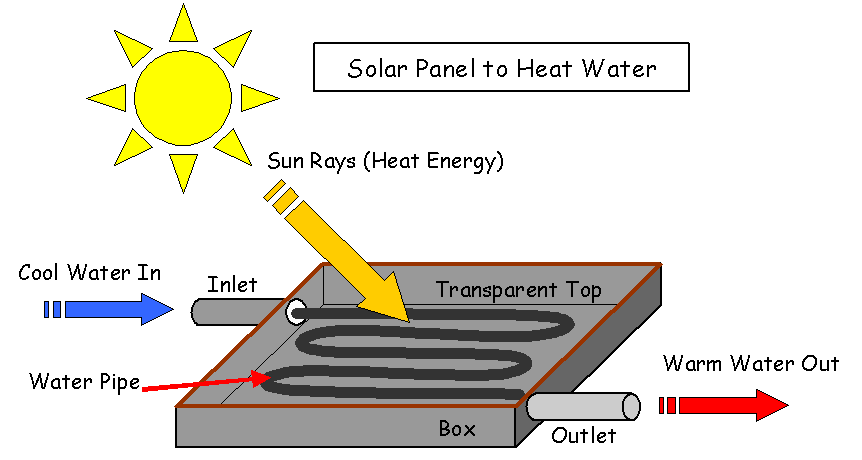
Solar panels that are designed to heat water work almost the same way as ones designed to heat air. In a simple example there is a pipe that runs through the inside of the box.
The sun rays heat the air inside the box. The heat in the air is transferred to the pipes then the heat in the pipes is transferred to the water. As cool water is pumped into the inlet pipe the warm water is forced out of the outlet pipe. We can now use this warm water for something like a bath or shower.
These pictures are only a simple representation of the basic concepts. In practice, solar water and air heaters can be more complex.
The terms "Solar Panel" and "Photovoltaic Panel" describe two different devices. We use the terms as follows:
A Solar Panel collects and utilizes heat energy from the sun.
A Photovoltaic Panel transforms light energy into electrical energy.
Welcome back!

Get the Right Tools
Before you begin working on the solar panel, make sure that you have the right tools with you. To build a solar panel, you will require silicone caulk and wood glue. Also, get hold of some wire cutters, wire strippers, a soldering iron and solder for wiring purposes. All of these tools are available in local hardware stores easily.
Get Solar Cells
This is the first important step involved in the process of building DIY solar panels. A standard 3×6 inches solar cell produces 0.5 volt and almost 3.5 amps of power. A typical panel generates 18 volts and requires 36 cells for each panel that you want to build. A lot depends on the quality of cells that you buy. Therefore, be careful of buying low quality solar cells as these will produce less power than better or high quality ones. Also, remember to inspect the cells before buying to avoid having ones with broken edges, damaged surfaces and other problems. Usually, solar cells come in a lot of 36, 100 or 108 cells. It is highly suggested to get pre-tabbed cells for these can be wired easily later. You can get these cells from local solar companies or the internet with sites such as eBay selling them.
Make the Box
The next step is to build a container that can hold these cells. This box can be made out of any material, but wood is mostly preferred. Cut any wood you have in the shape of a box with a Plexiglas cover and a hole for wires to pass through. Attach the cells to another piece of wood and place it in the box.
Wire the Cells
You now need to wire and solder 36 cells together in a series for your DIY solar panels. Having pre-tabbed cells saves much time and effort in doing that, but if you don’t have these, then you need to solder your cells on a diode. A diode will help you control the flow of your panel in one direction and storing power at night when there is no sunlight.
Finish off the Panel
The final step involves attaching the cells in the panel with the help of silicone caulk. Always apply enough caulk to the middle back of each cell. In the end, screw the box and take it out in direct sunlight for testing with a voltmeter. Attach the voltmeter with the panel and see if it reads between 18 and 20 volts. This ensures that your panel is built properly. The whole process to build your own DIY solar panels will cost you around $120/ each, which is almost 50-70% less than buying a pre-made one.


